It’s always exciting for audio/video enthusiasts and novices alike when their new speakers, big flat-screen TV, A/V receiver and other components arrive at the front door, ready to be unboxed and set up for the first movie viewing and home theater experience.
Sometimes, however, after setup, the initial impact of the experience may not meet the owner’s expectations. Disappointment ensues.
Frequently (with a couple of exceptions I’ll get to later) it’s through no intrinsic fault of the newly purchased audio-video equipment, but rather just plain old mistakes in system setup.
Herewith are some of the most common home theater setup mistakes that may just ruin your home-theater viewing/surround sound experience:
1. Too Much Light
While flat-screen TV images—plasma, LCD or DLP—can be adjusted to run much brighter than the screens in movie theaters, you do so at the risk of “blowing out” or “torching” the whites, blacks and colors, and wrecking the picture quality that these new high-definition TVs are capable of displaying.
Virtually all quality high-definition TV (HDTV) displays have a “Cinema” or movie mode that is intended to pre-set the screen brightness and contrast for viewing in a relatively dimly lit room.
Check your display’s remote control or on-screen menu for a “Picture” or “Picture Mode” control and choose the least bright setting (Movie or Cinema) for your home theater setup. The bright flashy modes, sometimes labeled “Demo” or “Dynamic,” are meant for store demos in brightly lit big-box stores, where often the brightest TV picture on display attracts the most customers. These demo modes remove all nuances of shadow, blacks, gray-scale and the color palette by overdriving the pixels so detail is sacrificed to brightness.
If you can’t find the picture mode adjustment, just lower the brightness and contrast settings to about half or less of the indicated range—try about 40 to 50 for brightness and contrast if the adjustment range runs from 0 to 100 like my Samsung does—which will get you close to a more realistic and pleasing picture display. Then readjust the color intensity and tint settings of your home theater setup for a natural picture and normal skin tone.
Hint: Use a live outdoor sports broadcast of tennis, baseball or football to adjust your TV’s brightness and contrast. You should still be able to see some detail in white tennis shorts and towels or baseball players’ uniforms if the brightness is correct; a batter’s helmet in baseball should look black, not gray, with some detail visible. If you are using a front projector and 96- or 110-inch screen in your home theater setup, invest in some blackout curtains to make the room dark and adjust the screen brightness so you get a full range of blacks, grays and white detail, as well as natural colors.
2. Hard to Understand Movie Dialogue
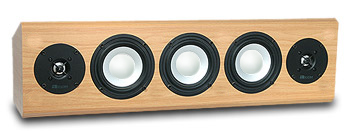
There is nothing more frustrating than not hearing the dialog in a movie clearly. From the emails I receive and the forums I moderate on the Axiom Audio web site, I’m amazed at how many people let their AV receiver’s auto-setup modes adjust the front and center speaker’s volume levels equally and never change them.
In a Dolby Digital 5.1-channel surround movie soundtrack, the center channel speaker carries all the movie dialogue and you can independently increase the center speaker volume above the other speakers in your home theater setup to make movie dialog louder and easily understood. Try choosing the speaker level menu on your receiver and increase the center channel by from 3 dB to 5 dB louder than the front left and right speakers and the surrounds. You may have to vary this setting because some dialog on TV shows and different movies may by mixed at too low a level.
Another impediment to clear movie dialog is poor placement of your AV system’s center channel speaker. Positioning the center too close to the floor or “burying” the speaker too far back on an entertainment-center shelf will encourage reflections that inhibit dialog clarity. The center speaker should be as close as possible to the screen of your display, immediately above or below it and angled up or down towards the seating area.
Keep the center within 24 inches or less of the screen if at all possible; it should “lock” the actors dialog on-screen so your eyes, ears and brain invisibly blend the aural and visual images from your home theater setup.

3. Mount the Surround Speakers at the Sides and Higher Up
In a 5.1- or 7.1-channel home theater system, the left and right surround speakers should go on each wall to the sides of the seating area (and a little behind) not at the rear, ideally about 3 feet or more above ear level when you are seated.
The fundamental reason for side placement of surround speakers in your home theater setup, besides the fact that Dolby Labs advise it, is that the 5.1-channel soundtracks for movies are mixed with the surround speakers above ear level at each side of the mixing theater or studio, just like in large movie theaters. And since we are trying to replicate or mimic the acoustic sound field that we experience in a cinema and hear what the sound engineers and the director heard when they panned and mixed the directional effects for motion pictures, surround speakers properly belong on each side wall of your home theater. (A 7.1-channel system adds two back surround speakers to your home theater setup that are intended for the back wall behind the listening area at about the same height as the side-wall surrounds.)
The goal of a great surround setup is a feeling of total envelopment in ambient sound—rain, wind, war, and weather sounds, auditorium and concert-hall reflections in classical or concert music, bullet ricochets, jungle sounds and so on.
4. Using Too Small Speakers in a “Great” Room or Big Room
While the compact “bookshelf” speaker has made enjoyable 5.1-channel home theater possible in a variety of living rooms and dedicated home theaters, really tiny satellite cube speakers (or worse, a “sound bar” or Home Theater in a Box) were never intended to fill a huge great room or big home theater with the impact we get from a home theater setup with larger floor-standing speakers and subwoofers.
If your home theater experience seems subdued or stunted, you may simply be trying to fill too big a room with too small speakers and subwoofers. Big rooms (larger than 4,500 cu. ft.) have a lot of air that has to be moved, so consider a gradual upgrade from that sound bar or HTIB to larger full-fidelity speakers and a powerful subwoofer for your home theater setup.

You can do so gradually as your budget permits: just replace the main left and right speakers with bigger, more competent models and then upgrade your surrounds to an omnipolar design like Axiom QS8s, whose two woofers and dual tweeters scatter ambient sounds in all directions for stunning surround envelopment.
Finally, donate the one-note boomer sub that came with your HTIB to your kids and get a subwoofer with a 12-inch driver, 300-watt internal amplifier (or larger), and a good-sized enclosure for your home theater setup.

Good subwoofers (with a few exceptions) by nature tend to have greater internal volume and larger drivers, plus very powerful dedicated amplifiers of 300 watts or more. That combination of internal volume, a big driver and large amplifier is unbeatable in reproducing frequencies of movie special effects—earthquakes, pod footsteps (“War of The Worlds”), spaceship sounds and explosions—as well as delivering deep bass drum and concert tympani in classical soundtracks.
5. Speaker, Subwoofer and Screen Locations are Crucial to a Great Home Theater Setup
It’s convenient to just routinely put the front left and right speakers and subwoofer where they fit best in a room, but you may be doing a terrible disservice to the home theater experience by poor placement.
The amount of deep bass impact you get from your subwoofer is highly dependent on its interaction and location within your particular room as well as where it’s placed relative to your seating area’s location. The sub does NOT have to go at the front of the room with the front speakers in your home theater setup because deep bass by nature below 80 Hz is non-directional (your other speakers will supply the “directional” upper bass impulses).
So if the subwoofer sounds great at the end of your couch or the back of the room and there’s room for it, then put it there as long as you hear good, deep bass in the seating area. (Google “subwoofer crawl” for a good tip on subwoofer placement to get optimal performance.)
An obvious place for flat-screen displays seems to be above the fireplace mantel, but be careful: it may be too high for comfortable viewing. Locate the TV display in your home theater setup so viewers do not have to look up at an angle. It should be roughly on the same plane as your field of vision when normally seated, or slightly higher.

Separate the front left and right speakers by 6 to 12 feet, depending on how far back you sit. You want a continuous stereo soundstage with no “hole” in the middle. Don’t try and hide your front speakers or subwoofer behind lattice-wood doors or inside special enclosures or cabinetry; the latter will generate degrading reflections and colorations that will inhibit the sonic fidelity of your home theater setup. Conventional speakers and subwoofers are designed to perform optimally in relatively free space. However, there are speakers designed especially for in-cabinet installation in custom-built cabinets that are capable of excellent performance comparable to free-standing speakers: http://www.axiomaudio.com/m60-in-cabinet.html
That’s it. Stick to the aforementioned home theater setup guidelines and you’ll have the recipe for unrestrained and thrilling home theater experiences. Happy viewing and listening!


